Wow, 5 years since my last post. That’s an unfortunate record, but not surprising. I started this blog to help me land a better job, and now that I’ve held one for a while and still like it, I haven’t had much need for this place. Yet here I am again, not because I’m seeking work, but because I have something kinda cool to show off.
My newest project was actually inspired by my awesome cousin. He came up with an idea for a logic puzzle that’s best described as sudoku, but with less math and more art.
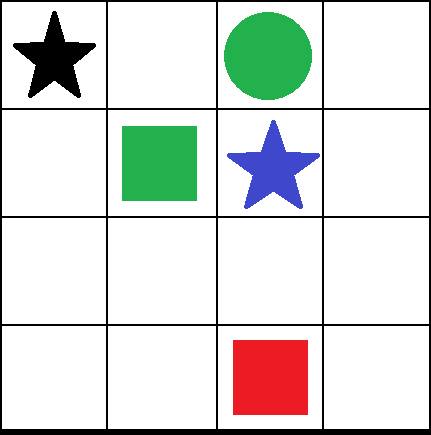
Here’s the very first prototype:

Now I’ll explain the rules.
- There are 4 colors – red, yellow, green, and blue
- There are 4 shapes – star, circle, triangle, and square
- The object of the puzzle is to fit one of every color into each row and column, as well as one of every shape.
- Additionally, you have to fit every possible color of every shape somewhere on the grid exactly once.
So, for instance, within the same column you couldn’t have 2 circles or 2 red shapes. And over the whole grid, you couldn’t have more than one blue triangle, for example.
In a given puzzle, some values will be filled in already. You might know the color, the shape, or both for any given space on the board.
Back to this particular puzzle, the star in the top left corner is shown as black because its shape is known, but not its color. It’s the job of the puzzle solver to figure out what color it should be.
So, for instance, the place most people would start in solving this would be a yellow triangle between the blue star and red square. Next, you might put the green triangle into the grid on the bottom left corner, since that’s the only place a green triangle can fit at that point. The puzzle continues along those lines until it’s solved.
In my case, I used some colorful unicode characters to play around with it on my own computer until I had a solution:

I was so taken by the possibilities of this game that I spent the next few days knocking together a way to play it in a webpage. The first result lives on here:
To play, click on one of the squares in the upper grid. That will let you specify a color, shape or both using the options in the bottom 2 grids, unless that value was already set by the constraints. If you make a mistake and can’t figure out what went wrong, you can hit reset to start over with just the original constraints and all your selections removed.
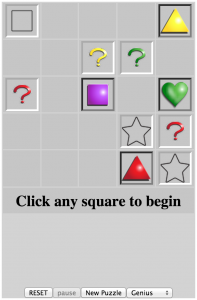
By the time I was able to play it whenever I wanted, one of the first things I realized is that the game could be much more challenging if it used 5 colors and 5 shapes instead of the 4×4 that my cousin’s first puzzle used. Building an algorithm that could generate random 4×4 puzzles was a challenge all unto itself, but it turned out my algorithm wasn’t nearly efficient enough to generate a 5×5 in a reasonable amount of time. So I ended up having to do a lot of work on it to get it to the point where I could do this:
For the record, I still can’t generate a 6×6, though not for lack of trying. The complexity of the problem grows enormously with each added color and shape. If I ever crack that problem, I’ll be pretty happy to see if I can actually solve a 6×6.
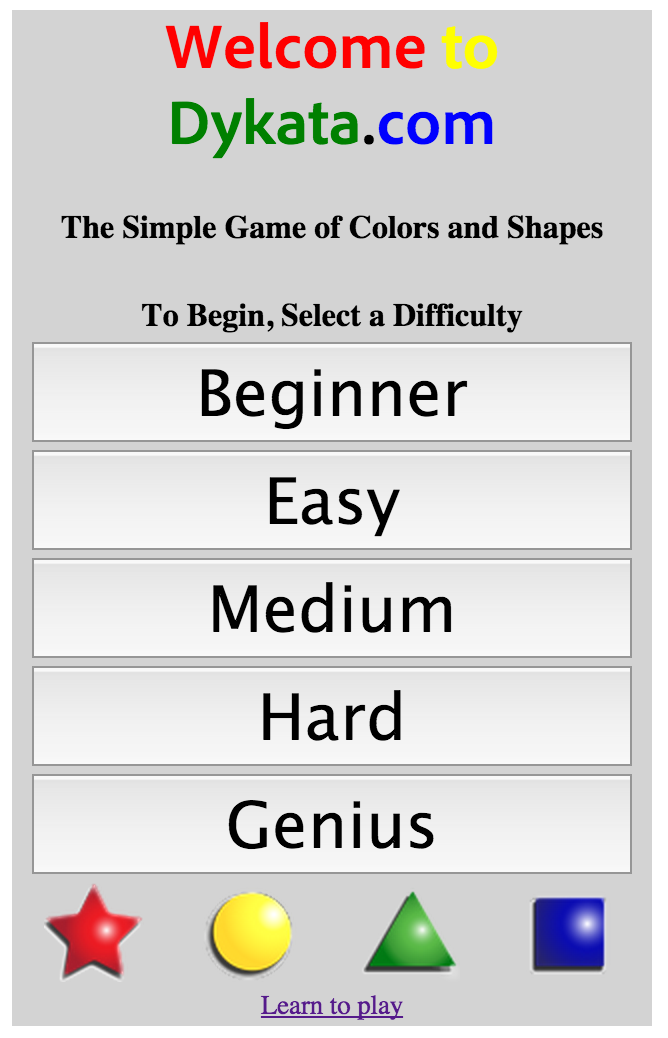
Anyway, that was the point where we decided to finally name the puzzle and give it its own home on the internet. Originally, we were going to call it “dichata” to suggest the term “dichotomy” as well as to invoke the 3 hard syllable sounds of sudoku. However, since “dichata” was taken already, we went with the spelling “dykata” and now Dykata.com is where you’ll find this guy in all its glory, complete with prettier graphics and Google adsense (because hey, that domain cost $10 to register so we have to make up our costs somehow).
Just a picture this time, sorry.
But don’t those graphics look pretty?
But in my mind, the web-based version of this game was just a prototype for what really deserves to be an app you can play anywhere, whether or not you’re connected to the internet. So I coded it up using Android studio (an awesome and free IDE from the folks behind JetBrains) and submitted it to the Amazon app store.
Why the Amazon store and not Google Play, you might ask? Simple – Amazon was free whereas registering as a developer with Google was going to cost $25. Did I mention I was doing this on the cheap?
So at long last, here’s the link where you can get it for yourself, provided you have the Amazon app store installed on your phone and you allow apps from unknown sources.
As apps go, it’s pretty basic. There are 5 difficulty settings to choose from. I discovered I could make the puzzle a lot easier by randomly adding constraints so that there was less to solve for yourself. If the first two puzzles on this page were a little too tricky, don’t feel bad. Most people start off by playing beginner.
What it’s missing is a way to save your high scores, a way to share your best times with friends on social media (though taking a screenshot and posting to Facebook is still a viable option). It should also have its own sound effects and maybe some light background music, and probably most important, it should either have a LOT more puzzles pre-installed or be able to generate its own on the fly the way the website does. Play it for a day or two and you’ll start noticing the same puzzles over and over.
But it is fast, light, and easy to use. It also hasn’t got any ads and it’s free. If it proves popular, and I hope it does, I’ll do some more work on it to address its current shortcomings, but in exchange for that work I’ll either add some ads or charge for it.
If I do, I might even come back to my lonely little blog and update this post. Though honestly, it took 5 years to get me back here, so I’m not sure if that would be enough to get me back again.
May 11 2015 | Uncategorized | Comments Off on Dykata – my first Android app
I’ve decided it’s time to split off my PHP training material from hiremasonwolf.com. I’ve registered the domain phppowercoding.com and that’s now the primary repository for all future training video transcripts.
I’m not going to take any down from hiremasonwolf.com, since I don’t want to break my incoming links. However, there will be no new transcripts added here. I’m not really sure I’ll do much else with this blog except occasionally update my resume or point out an interesting project from time to time. But then again, that’s all a resume and portfolio site really ought to be. I’m just using WordPress as my CMS because it’s so convenient. This isn’t really a blog in the traditional sense.
March 13 2010 | Uncategorized | Comments Off on Introducing phppowercoding.com
So far we’ve only looked at how to write PHP code. But just as important as your code can be the comments you write to explain what your code does.
PHP supports 3 different ways of writing comments. The first 2 are borrowed from C. There’s the double forward-slash format:
//this is a comment
and the multi-line comment:
/*
This is a comment that can include many lines
*/
And lastly there’s the shell-style comment with the # sign:
#this is another comment for just one line
The way the single line comment works is that everything following the start of your comment until the next new-line will be commented out and ignored by the interpreter, but with one rather important exception: PHP ending tags.
So, for instance, the following code will break:
// echo ‘<?xml ?>’;
And it doesn’t matter whether that’s a pair of forward slashes or a pound sign. Personally, I always use the forward slashes since there’s no functional difference between them, and it’s what I’m used to.
But anyway, what’ll happen is that the ?> will be seen by the interpreter as an end of the PHP block. Anything after that will just get printed directly to the page. Without the comment, PHP would have seen that as part of a quoted string, and known not to treat it like an ending tag. But once you have the comment there, it won’t recognize the quotes around it. It’ll just be treated like a closing PHP tag.
In this case, the only solution, if you really need that line commented out, would be to use the multi-line style comment. However, you have the freedom with that comment type to comment just a section of a single line.
Basically, the way multi-line comments work is they tell the interpeter to ignore anything between a /* and a */. Once the interpreter enters a comment block of that type, the only thing it looks for is an ending mark for that comment. And if it finds it on the same line or a thousand lines down the page, it makes no difference as far as the interpreter is concerned.
So, rewriting that comment:
/* echo ‘<?xml ?>’; */
And that comment will work just fine.
It’s worth noting that the multi-line comment ignores PHP ending tags as well. So, something like this:
<?php /* ?>
<p>Here is some HTML</p>
<?php */ ?>
would be a way of commenting out a section of HTML so that it didn’t get sent to the page. Just remove the beginning and ending tags for the comments and the HTML fragment will re-appear.
Now, the pit-fall with this type of comment usually happens when you try to nest them by mistake. Suppose you need to comment out a large block of code, but somewhere in that code there’s already a multi-line comment block, for instance like this:
/*
… lots of PHP code
/*
The following function does something wonderful
*/
function doSomething() {
//… do something wonderful
}
… more PHP code
*/
In this case, the PHP interpreter would see the first comment-ending tag, and treat everything after it as regular PHP. But then it would hit the intended comment-ending tag, and throw a fatal parsing error, since ‘*/’ isn’t a recognized PHP expression.
So, just be careful when blocking out large sections of code this way. If you use an editing environment like mine, it’ll alert you to this sort of mistake.
Now that we’ve looked at comments, a good programming tip is to use them to explain in plain English what your script is doing at each step of the way, before you actually write your code. This way, so long as your logic makes sense, you can just write your code to do what you intend to do and be fairly confident that your functionality will work as intended. If there’s a mistake to track down, then knowing exactly what the code ought to be doing can be a huge help, rather than trying to make an informed guess based on contextual clues.
Another use for comments is in removing a line or lines of PHP that you don’t want to execute. This can be especially important when you’re debugging, and we’ll look more at that in a later video.
March 09 2010 | Basics and PHP Programming Basics and PHP tutorial scripts | Comments Off on Commenting
We’ve already looked at using the GET superglobal array to get data from the user through the URL. Another way to get data from the user is through forms. Different form elements work differently.
Here’s a simple webpage with a form on it, I’ve mixed in one of each of the input element types that HTML provides, not counting ‘file’ since we’ll cover that in a later video:
{show output}
Behind the form, this is what it looks like:
{show source}
The first thing to look at is your form tag. The important attributes here are ‘action’ and ‘method’. If the form only contains a short amount of information – no textareas and text fields with maxchars set at numbers below 255, you can actually send up to 4000 or so characters’ worth of data through the URL when you submit the form. The way this will work is your browser will automatically encode the form data into a string, similar to how http_build_query works, and append it to whatever URL you specify in the action attribute. You do this by specifying GET as the method (that’s not case sensitive).
Personally though, I hate the way GET makes the URL look on any form with more than one or two elements, so I almost always use the other method, called POST. POST transmits the form data in a manner that’s invisible to the user, and it can handle as much data as you need.
To access your user’s submission, you have to specify the address of your php file within the action attribute. If you specify an empty pair of quotes, it’ll just submit the form data to the same URL the form is on.
Some programmers mistakenly assume that POST is somehow more secure than GET, just because the data is in plain sight in the address bar. And it’s true the if you want to prevent a hacker from sending someone to a completed form by using a link, then yes, POST might be better. But the truth is, in most respects, while GET is more visible, any hacker is going to have just as easy a time forging a POST request as they would with GET. There’s a whole chapter later in this tutorial that deals with security, but the first rule of security is never trust data that originates from the user. Doesn’t matter whether it’s GET, POST or any of the others I haven’t introduced yet. If it came from the user, check it and make sure it’s valid before you use it.
There are several types of input elements you can add to a form. You’ve probably encountered them all at some point just as a web surfer. However, we’re only going to look at a few. These are the text box, checkbox, radio button, hidden field, and the submit button.
All of the fields we’re going to look at are variations of the “input” HTML element. The input element has one required attribute – “type” and a few optional attributes. If you don’t specify a type, you’re violating the w3 standard for HTML, but in most browsers, rather than breaking the page, they’ll just treat it as text, since it’s the most common. So since it’s sort of the default, we’ll look at that first.
Here’s a simple text input element:
<input type=”text” name=”text1″>
In addition to a type, if you want to actually collect the data from your form in a meaningful way, another attribute your input elements should have is a name. Whatever type you use it for, the name will become the key your PHP script will use to reference the value submitted.
On the server, there are another couple superglobal arrays we haven’t looked at yet called POST and REQUEST. When I submit this form, the value of this input element, whatever it is, will be contained in the key ‘text1’ in both the POST and REQUEST superglobals. But they’re not redundant. POST will only have variables submitted through a form that uses the post method, whereas REQUEST will contain everything in both POST and GET, as well as another superglobal called COOKIE.
Here, I’ll prove it:
<?php
echo ‘POST[text1] = ‘ . $_POST[‘text1’] . ‘<br>’;
echo ‘REQUEST[text1] = ‘ . $_REQUEST[‘text1’];
{switch back to form, type “Hey Let’s Go!”}
And so you see that my data has been submitted to the server. My own recommendation is that you rely on POST when posting, and GET when passing through the URL.
By the way, if you try this out yourself, and you see forward slashes in front of your apostrophes, it means that your php installation has magic quotes turned on. If that’s the case, I recommend you read the PHP manual under security to learn what magic quotes are, and decide if you want to turn them off. It’ll give you instructions on how to do it. The feature is deprecated in PHP 5.3 and removed in PHP 6, so turning it off is the best option if you’re not already working on a site that relies on them.
Now, back to the name attribute here, you can actually use square brackets in the name itself to specify that the value is part of an array. I’ll prove that now:
{modify name attribute to be text1[key1][key2]}
echo ‘POST[text1][key1][key2] = ‘ . $_POST[‘text1’][‘key1’][‘key2’] . ‘<br>’;
And you can see that that works. I don’t have to use associative arrays either. If I wanted, I could have ten different elements all named like ‘var[]’ and they would automatically get set as a numerically-indexed array within POST called var.
Moving on, the hidden element has another attribute. Technically all of the input elements support it, but I ignored it with the text type. It’s the value attribute. The way hidden works is it sends a name/value pair to the server without any input needed from the user. Pretty simple right there.
The radio element is designed to work with other radio inputs that have the same name. Your script specifies a value, but that value only gets sent to the server if the radio button is checked. And with other buttons of the same name, the browser is responsible for ensuring that only one of the elements can be checked at a time.
{show radio button clearing another radio button}
Since each button has the same name, my script can tell which one was checked based on the value that gets passed with that key.
Checkboxes are similar. You don’t have them all named the same, although you can. But more than one can be submitted with the same name. The way all these inputs work is that if an element lower down on the page sends a value corresponding to the same key then only the latter element actually ends up in the POST array. Of course, that’s not counting ones with empty square brackets at the end – have as many of those as you want and they just keep getting appended to an array. And in fact, that’s not an uncommon thing to do with checkboxes. But if you have either radio buttons or checkboxes where none are checked, they don’t get submitted to the server, so a common use for hidden elements is to place them above your checkboxes in the code. That way, you can send a value to the server letting your form processor know that the box was left unchecked. But if the checkbox is checked, its value will be the one that shows up instead.
Anyway, my checkboxes are simple. They have names and all their values are 1’s. Above them all is a hidden field with the same name and a value of 0. So, my form processor knows whether they were checked or not. Because input elements lower down will override elements with the same name higher up on the form, the hidden element’s value will only get transmitted to the server if the corresponding checkbox is unchecked. But if the checkbox is checked, its value will be sent to the server instead.
if($_POST[‘cb1’] == 1) {
echo ‘cb1 was checked’;
} else {
echo ‘cb1 was not checked’;
}
The last input type is the submit button. I’ve been using it each time I’ve submitted the form, so let’s look at how it gets created:
<input type=”submit” name=”B1″ value=”Submit”>
The ‘value’ attribute is what shows up on the button when your user looks at the form. As for the ‘name’ attribute, it’s optional, but if I provide it, I can access the button’s value in the POST global through my PHP script. The ‘submit’ button isn’t the only way to create a button through HTML, but it has the special property that when your user clicks a submit button, it causes the form to be submitted. And if you have several different submit buttons on your form, you can check the POST array to find out which one was submitted. The submit button’s value only gets sent if the user clicks it. If it’s just on the page, but not clicked, then the POST array doesn’t get any information from it.
<input type=”submit” name=”B1″ value=”I am B1″>
<input type=”submit” name=”B2″ value=”I am B2″>
<input type=”submit” name=”B3″ value=”I am B3″>
<input type=”submit” name=”B4″ value=”I am B4″>
if(isset($_POST[‘B1’])) {
echo “You clicked B1”;
} elseif(isset($_POST[‘B2’])) {
echo “You clicked B2”;
}elseif(isset($_POST[‘B3’])) {
echo “You clicked B3”;
}elseif(isset($_POST[‘B4’])) {
echo “You clicked B4”;
}
{add the code shown above, click the form a couple times to prove it works}
So, that’s about it for forms. There’s more to them than what I’ve introduced, but this should be enough to get you started.
March 07 2010 | Schmategories | Comments Off on Getting Data from the user – part II
Welcome to WordPress. This is your first post. Edit or delete it, then start blogging!
February 15 2010 | Uncategorized | Comments Off on Hello world!
When it comes to being really useful, PHP’s greatest benefit comes when it can modify the contents of a page based on how a user interacts with it. Key to that ability is getting information from the user to reach your scripts.
There’s a couple different ways to do that. The first way is by passing information through the URL. You do this with a ? in your URL after the end of the filename, like this:
file.php?name=Joe
In your script, you can access that variable with the special super-global array $_GET, like this:
echo ‘Hello ‘ . $_GET[‘name’];
{show output}
However, it’s worth noting that this is actually a security hazard. We talk more about cross-site scripting later, but imagine some malicious hacker linked to your site like this:
<?php
echo ‘<a href=”file.php?name=’ . rawurlencode(“<script type=\”text/javascript\”>setTimeout(\”alert(‘Your PC is infected with a virus. Click here to buy some fake anti-virus software’)\”,2000);</script>”) . ‘”>click here</a>’;
?>
{show result of clicking in firefox}
By the way, for my personal browsing, I typically use Google Chrome. One of the neat things about Chrome is that it notes whenever the URL includes javascript and it won’t run that javascript fragment if it appears in the webpage. It specifically protects me from an attack like this. But firefox, another browser I sometimes use, has no such protection, which is why I’m using it here.
So, to protect your visitors, before you echo out a variable that gets sent directly from the URL, just use one of the special PHP functions like ‘htmlentities’ or ‘strip_tags’ or another similar function:
echo htmlentities($_GET[‘name’]);
{show new output}
So, moving along, to pass more variables, you string them together with the &, as in:
file.php?name=Joe&lastName=Smith
$_GET[‘name’] = htmlentities($_GET[‘name’]);
$_GET[‘lastName’] = htmlentities($_GET[‘lastName’]);
echo “Hello $_GET[name] $_GET[lastName]”;
{show output}
Whether you pass a number or a sequence of characters, doing a gettype proves that these variables are always strings. But that’s ok since anything that can be sent through a URL can be expressed as a string.
Now, this is probably a good time to talk about register_globals. In PHP 5, register_globals is turned off by default, but it’s a directive in PHP that lets variables passed through the URL become variables inside your scripts without needing to go through the $_GET super-global array. It’s turned off in PHP 5 by default in order to get people with PHP 4 scripts to take the time to update their code while still giving them a way to the code work, if they turn it on. In PHP 5.3 register_globals is officially deprecated, and in PHP 6, register_globals is gone.
However, it’s worth mentioning, so I’ve turned it on for the moment. In a later video we examine how to change the ini directives, so I won’t take the time right now to show you how I did it, but here’s the gist of it:
echo “Hello $name $lastName”;
$name and $lastName aren’t defined anywhere in my script. With register_globals, I can add any variable to the global scope just by sticking it into the URL. And since it’s on, here’s the output:
{show output}
So, that was how things were passed from the URL in PHP 4.1 and earlier, back before the superglobal arrays were added to the language. But the PHP engineers decided this made it far too easy to introduce security vulnerabilities. Take this example:
if(reallySecureLoginFunction() === true) {
$authorized = 1;
}
if($authorized == 1) {
include(‘reallySecureContent.php’);
} else {
include(‘userNotAuthorized.php’);
}
Without register_globals, there’s no way for $authorized to be set except in the case that reallySecureLoginFunction returns true. But with register_globals, all the user needs to do if he wants access is add ?authorized=1 to the end of the URL. What the PHP best practices told people to do was make sure that all variables get declared before they’re used – simply adding $authorized = 0 before the call to reallySecureLoginFunction() would have been enough to prevent this security exploit.
But novice programmers, sort of by definition, didn’t know the PHP best practices, and PHP certainly didn’t throw up any kind of error if they didn’t follow them. So, to get rid of the security hole, they turned off register_globals and told people not to turn it on, which is exactly what I’m passing on to you. Don’t turn it on. If you do, and you rely on it being on, you won’t be able to migrate your scripts to PHP 6. And it makes it really easy to accidentally make your scripts insecure.
In addition to simple string variables, I should point out that it is also possible to pass arrays from the URL. The syntax is a little different, but easy to understand, because it uses square brackets just like building a PHP array:
?file.php?names[]=Jim&names[]=Kate&fruits[red]=plum&fruits[yellow]=banana
To access these values in your script, simply treat $_GET like a 2-D array:
echo $_GET[‘names’][0] . ‘ wants a ‘ . $_GET[‘fruits’][‘red’];
Now, you wouldn’t typically expect your users to type these extra parameters into the URL the way I’m doing. Generally, you provide a link, they click it, and these parameters are automatically filled in. To help you build a link with the variables in it, PHP provides a useful function called http_build_query.
http_build_query takes an associative array as the first argument. I you want to use a numeric-indexed array, you can, you just need to provide a prefix so the function can give you valid variable names. That’s your second argument, if you decide to include it. For instance, if you have an array with 3 items that uses numeric indexes, and your prefix is ‘myvar_’ your variables will be myvar_0, myvar_1, and myvar_2. And since they don’t start with numbers, they’re legal variable names. Of course, since register_globals should be off, and you’ll be accessing them inside an array, you can also just leave them as numeric indexes, without the prefix, and access them as keys 0, 1, and 2 inside $_GET.
So, here’s an example of a simple script I’ve created.
{show output}
It gives me a choice of links, and depending on which one I click it shows a different pair of images at the top.
{click links, show changing page}
But these are all using the same PHP script. I’ll show you how it works:
{display script}
So, with nested foreach loops I go through both arrays, and create a combination for each possible image pairing based on the two sets of images, using the keys as the variables I pass through the URL when someone clicks on the link that pairing creates.
Notice the call to http_build_query has one last argument. This is what determines the variable separator. By default, it’s the &, but I’ve picked ‘&’. I did that because to have valid HTML markup, the & needs to be replaced with the special HTML entity, and that’s the code &.
So, that concludes the lesson on passing variables through the URL. In the next video we look at using information collected from forms.
February 14 2010 | Basics and PHP Programming Basics and PHP tutorial scripts | Comments Off on Getting data from the user – part I
In the previous video we looked at how to specify the location of a file to include both through using an absolute path as well as a path relative to the include path. In this video, we’re going to look more at how and why to include files.
To begin, you might be wondering – what are some situations where you might want to place your data into a separate file? Well, one situation is where you have a configuration file. A config file typically sets up variables that are needed by your script for things like connecting to a database, or connecting to an outside web feed, or setting certain parameters on or off – like whether the site should be in maintenance mode. Depending on how your site is configured, you might even be able to swap out config files and completely change your site from top to bottom. That’s some pretty sweet power when you can do that.
Other possible things to place in external files could be a list of constants you want defined at various points in your script. Since constants all need to be unique, keeping them in one script makes it easier to ensure that you haven’t already named a constant with a certain label. It’s also an easy reference to check when you need to know what constants you’ve already defined.
Pretty much the exact same argument for constants can be made for your custom functions. It can be awfully handy to keep them in their own separate file too.
So, the way this works is as soon as you include a file, any variables set within it become accessible beginning with the line immediately after the include statement. Conversely, any variables already defined by the line of your include statement are available within the file you’re including. In addition, it is entirely acceptable to include a file from within a function, it just won’t have access to variables defined in the global scope. So anyway, here’s a simple example:
{show example scripts}
I’ve written this script to do three simple things. It will define the variable $var1 as ‘hello Mason’. Then it will include the script include.php, and then it will display the value of $var2. Meanwhile over here, my script ‘include.php’ will do just 2 things. It will display the value of $var1, and it will define the variable $var2 as ‘good-bye Mason’.
{show output}
And as you can see we get a quick hello and good-bye message, because $var1 was available in include.php, and $var2 was available in the main script. Now if we flip the main script, and try to access $var2 before we do the include, and then set $var1 after the include:
{show output}
You can see nothing happens, since the variables aren’t yet defined when the scripts try to use them.
Now, the same thing is true of constants. If you try to access them before including the script in which they’re defined, you won’t get their values. What PHP does instead is throw a notice, and depending on your error reporting setting you may or may not know that it threw the notice. And then it just tries to use your constant like a string, as though you had put quotes around its name.
However, this is not the case with functions. When the parser checks over your script, if it sees that your function will definitely be defined, as opposed to defined only if the logic of a particular branch is used, then you can actually call that function higher up in the script than the line where the file that has its definition gets included.
{show example code}
So here the file functions.php gets included further down than my call to doSomething(). But when you look at the output:
{show output}
You see that the function got invoked anyway.
Alright, so last way of using the include statement is with files that don’t contain PHP, or else contain a mix of PHP and other things. When this happens, the contents of your file just get thrown out to the page:
{show example HTML fragment}
{show output}
And you see it showed up. Basically, all an include statement does is add the contents of any file to one long script that the parser generates when it makes its first pass over your code. And then the interpreter actually runs that script. So you don’t need to think about whether you’re adding php or non-php files. They’re all just parts of that one long script. And if there’s no PHP block, the engine just prints them to the page uninterpreted.
An important note about why that last example worked – when you import a file with include or require, PHP does not assume that the included file needs to be interpreted as PHP. If it does, your file needs to include the PHP opening tag. Without it, your file’s contents get output to the page directly with no interpretation.
Another thing to know about include is the fact that PHP supports ‘include_once’ and ‘require_once’. These alternatives can be useful if, for instance, you’re importing a file that defines functions or constants. Including one of these files more than once will trigger a fatal error, since it treats it as though your script is trying to define these multiple times, which isn’t possible in PHP. With include_once and require_once, the PHP engine won’t import the file if it has already been imported previously.
The last thing to know about including and requiring files is that you can use the return statement from within an included file. It works the same as a return statement from within a function. It stops execution of the script, and can optionally return a value. If it does return a value, you can capture that value the same way you would with a regular function. Just assign the value of your include or require statement to a variable in the calling script.
So, let’s look at this in action:
(in calling script)
$returnVal = include ‘./includeMe.php’;
echo $returnVal;
See I’m assigning the return value of this include call to the value $returnVal, and then displaying it.
(in includeMe.php)
<?php
return ‘Hello World!’;
echo ‘Good-bye’;
And in the included script, I’m returning the string ‘Hello World!’ and then displaying ‘Good-bye’.
{show output}
And sure enough, we see ‘Hello World!’ because the calling script was able to use the return value of the included script. But we don’t see the words ‘Good-bye’ because the included script stopped executing after the return statement.
The ability to import files is very useful in PHP, or really any modern programming language. Now that we’ve studied the concept, most of the videos from here on out will involve including or requiring additional files.
February 14 2010 | Basics and PHP Programming Basics and PHP tutorial scripts | Comments Off on Include and require – part II (how to use an included file)
Up until this point, we’ve only looked at scripts that are contained entirely in a single file. But in PHP you actually have the ability to split your work up into lots of different files. And in fact, this can be a very handy thing to do, as it can allow you to more effectively organize related portions of your code, and also help to prevent a file from becoming too long to understand.
PHP actually supports two different ways of including external files in your script. There is the include statement, and the require statement. There’s an important distinction between these two statements. If you try to include a file with the include statement, and the file doesn’t exist, the script continues executing anyway. On the other hand, if you try to include that same file using the require statement, your script will trigger a fatal error. This can be a handy thing to do when you know that without that file, your script is going to fail anyway, but the require statement’s error is generally going to be a little more obvious and easier to debug than the result you get when it fails at some later point while using include.
Here’s how the statements look:
include(‘includeMe.php’);
require(‘requireMe.php’);
What these statements will do is cause the contents of the specified files to be inserted into your script at the point where the include or require statements are run. Technically, both ‘include’ and ‘require’ are not functions, but actual language constructs, which is why my editor is coloring them blue. Most language constructs have some quirk about them that make it obvious they aren’t actually functions. Include and require are no different. In their case, they’re like echo statements (echo being another language construct), in that they do not need parenthesis around their arguments:
{modify code to demonstrate}
See? The editor isn’t reporting an error.
In this case, you’ll notice my statements are ambiguous about where the files to import are actually located. I’m using what’s called a relative path. But relative to what? Well, that’s not clear from this context. But obviously my script was written with the assumption that the place PHP looks for these files, called the include path, contains the directory where these files ought to exist.
An include path is a string, and it works like the Windows or Unix environmental variable “PATH”. If you’re not familiar with it, it’s basically one string with either colons separating each directory path if you’re in a Unix environment, or semi-colons separating each if you’re in Windows. And when you use a relative path name, it just searches for the file in each of the include path’s directories, one at a time, until it finds a match, and then it imports that file. If it exists in two locations, only the one that gets checked first will be imported. If I want the second one, I have to use the full path to the file, starting with the root directory.
So now let’s look at the include path on my own PHP install. I’m on a Mac, so its going to use the Unix-style path separator: the colon.
echo get_include_path();
The get_include_path function, since I haven’t modified the path anywhere in my script, is going to get the value set in my php.ini file. We look more at the php.ini settings file in a later chapter. For now, here’s the output from this script:
{show output}
And that tells me which directories I can include from without first altering my include path. Notice the period at the start. This was just the default setting when I installed my XAMPP server. What that does is tell PHP to always check the directory of the file currently being executed first, before looking in other directories. So, if ‘includeMe.php’ and ‘requireMe.php’ exist in the same directory as the script that imports them, I don’t need to make any change to my path in order to import them this way.
Now, suppose we want to get a file that isn’t in this path. Well, if we know the full path to the file, we can either modify the include path if we’re going to be getting several files, or we can use the file’s absolute path if we just need to include from that directory one time.
When you use an absolute path – that is, a path that begins with the root directory, be that a drive letter in Windows or a forward slash in Unix, PHP doesn’t look at the include path setting at all. And because it doesn’t, there is a slight performance benefit from including your files this way. But it’s often the case that we’re not sure of a file’s absolute path ahead of time, or we want the freedom to deploy our code on numerous sites, in which case we can be sure that the absolute paths to our files are going to change. So, a better way to handle this situation is typically to modify the include path once and then use relative paths everywhere else. PHP lets us do that with the set_include_path function.
Since it’s a pretty common task, I’ll show you how to add the current script’s directory to the include path the right way:
set_include_path(get_include_path() . PATH_SEPARATOR . __DIR__);
In this case, I’m not overwriting the existing path, I’m just adding to it. And by the way, the __DIR__ magic constant has only been available since PHP 5.3. On older systems, you would use:
set_include_path(get_include_path() . PATH_SEPARATOR . dirname(__FILE__));
The constant ‘PATH_SEPARATOR’ is one of the ones defined for us by PHP, and we can always count on it being the correct value – whether a semi-colon in Windows or a colon in Unix – no matter what system we’re using.
Before I move on though, one last thing I want to point out. Suppose that includeMe.php and requireMe.php really do exist in the same directory as the file that imports them. If that’s the case, then this:
include(‘./includeMe.php’);
require(‘./requireMe.php’);
is considered an absolute path, and so it’s going to be a little bit faster than using the include path, even if it also begins with a period.
That’s all for this video on the include path. In the next video, we’re going to look at what happens when you actually start including files.
February 13 2010 | Basics and PHP Programming Basics and PHP tutorial scripts | Comments Off on Include and require – part I (how to include a file)
We already introduced variable scope while looking at how variables behave in functions, but there’s much more to learn about it. In the video on functions, I hinted that there are ways to access and modify variables declared in the main script from within your function. Actually, there are three specific ways to do this.
Now, I want to get terms straight at the beginning. Variables defined outside of functions are said to be in the global scope, and variables defined inside of functions are said to be in that function’s local scope. I’ll use those terms throughout the rest of this video.
Now, there are actually two different ways to access variables in the global scope from within your function. The first way is to use the special PHP keyword ‘global’.
So, here we have a function that doesn’t take any arguments. Check it out:
function doSomethingGlobal() {
global $var1;
$var1++;
}
$var1 = 10;
doSomethingGlobal();
echo ‘$var1 is ‘ . $var1;
{show output}
With the global keyword, the PHP engine looks for a variable named $var1 in the global scope, and if it finds it, it uses a reference to that actual variable anywhere inside the function that it gets called. So, when I make a change inside the function, that change is reflected when I check $var1’s value later.
{show output}
And if it doesn’t find it, it creates a new entry in the global scope. So, we can actually make new global scope variables from within the local scope of a function this way:
function doSomethingGlobal() {
global $var1;
$var1 = 15;
$var1++;
}
doSomethingGlobal();
echo ‘$var1 is ‘ . $var1;
So here $var1 isn’t declared before the function gets called, but after running this function the outer code can access $var1 and get its value.
{show output}
When using the global keyword on multiple variables, I can use just one line by separating each variable name after the global keyword with commas.
There is another way to use global variables however, and that’s by using what are known as super-globals. These are arrays that are available in all contexts. However, there’s only one super-global array that I want to talk about here. Others will be introduced in later videos as we look at topics where they’re relevant.
$GLOBALS;
$GLOBALS, in all caps, is an array containing all of the global-scope variables in your script. In order to access a variable in the global scope from within the local scope of a function, use the name of the variable as a key, and the value in $GLOBALS will be the value of the variable it refers to. So, let’s rewrite our function again, this time using the $GLOBALS super-global array:
function doSomethingGlobal() {
$GLOBALS[‘var1’]++;
}
{show output}
Basically, all I’ve done is treat $GLOBALS[‘var1’] as though it were the variable, $var1, and then incremented it. The other cool thing about this, is that just like using the global keyword, using the $GLOBALS super-global lets me create new variables in the global scope:
function doSomethingGlobal() {
$GLOBALS[‘var1’] = 10;
}
echo ‘$var1 is ‘ . $var1;
{show output}
So, that’s how global variables work. In later videos we’ll look at other super-global arrays that are useful for different tasks, but all of them can be accessed in any context without using the ‘global’ keyword.
The last method for accessing a global variable inside a function’s local scope is through what’s called ‘pass-by-reference’. I mentioned the reference operator, the &, briefly in the video on foreach loops. You may recall that by placing an & in front of the name assigned to each value as you iterated over an array, your loop could actually change the values in the array. Well, you can use the same operator in the context of your functions’ argument lists, and it gives you the same ability – that is, you can alter the variables passed into your function, and the changes will be reflected in the global scope.
Technically, passing arguments by reference has nothing to do with variable scope, but it’s an important enough topic that I don’t want to move on before talking about it. When you call a function with a variable, as opposed to a literal, unless that variable is an object (and we talk about objects in a later chapter, so don’t dwell on this if you’re not familiar with them), but unless it’s an object, the variable that your function actually uses is the passed variable’s value, and not the passed variable itself. This is an important point, because it means that, as we’ve already seen, if you change the value of that variable within the function, nothing about the variable you sent from the line that called your function will be affected. That’s how things work normally. In programmer terms, we refer to this type of function call as ‘pass-by-value’.
Here’s a simple example of what happens when you change a variable within a function under a normal case:
function doSomething($var1) {
$var1++;
}
$var1 = 10;
doSomething($var1);
echo ‘$var1 is ‘ . $var1;
{show output}
Note that nothing changed about $var1. That’s because the two instances of $var1 exist in two different PHP symbol tables. However, PHP also supports something called ‘pass-by-reference’. This is what you use when you do want a change inside a function to affect a variable that was sent to the function. In order to do this, just put the reference operator, the &, inside your argument list in front of any variable you want passed by reference. Watch what happens:
{place & in front of $var1 in function argument list}
{show output}
So, what just happened? Well, the two instances of $var1 are still part of two different scopes. However, inside the function, the $var1 it uses is actually a reference to the first variable. So as far as the function is concerned, it can use its variable the exact same way as it did before when it was just passed by value, but now, if the function makes a change to its copy of $var1, the original $var1 also gets affected.
And by the way, I only named the variables the same to help make the concept easier to understand, but I can name it whatever I want inside the function and it’s still a reference to whichever variable was passed in through the function call:
{change $var1 in function to $someVar}
{show output}
See? Makes no difference what I call it – it’s still a reference.
However, even when passing by reference, PHP is still keeping the variables in two separate symbol tables, which is made a little more obvious when I can change its name.
Using the reference operator, it’s also possible to get a reference to a variable in other contexts. Let’s look at a final example:
$var1 = 10;
$var2 = $var1;
$var2++;
echo ‘$var1 is ‘ . $var1;
{show output}
Notice, $var2 is just a copy of the value and type in $var1, and not a reference to $var1 itself. Now, with the assignment operator watch what happens:
$var1 = 10;
$var2 = &$var1;
$var2++;
echo ‘$var1 is ‘ . $var1;
{show output}
This time, $var1 actually got updated too. And that’s because $var2 isn’t a copy of $var1’s value, but a reference to $var1. And when $var2 changes, it affects $var1.
If you want to de-reference your variables, you can use the special PHP function ‘unset’. It will set a variable to null without affecting the other variable:
$var1 = 10;
$var2 = &$var1;
unset($var2);
echo ‘$var1 is ‘ . $var1 . ‘<br>’;
echo ‘$var2 is ‘ . $var2;
{show output}
$var1 = 10;
$var2 = &$var1;
unset($var1);
echo ‘$var1 is ‘ . $var1 . ‘<br>’;
echo ‘$var2 is ‘ . $var2;
{show output}
February 12 2010 | Basics and PHP Programming Basics and PHP tutorial scripts | Comments Off on Variable Scopes and References
As programmers, we often find that we’re performing the same logic at different times in a number of different places. So, to simplify our code PHP lets us define our own custom functions.
A function is a short-hand way of telling PHP to perform a series of steps we’ve defined in advance. A function can accept 0, 1, or multiple arguments as input, and can optionally return one value as output. Of course, if you need to return multiple values, you can bundle them together in an array and return the array.
Here’s the basic syntax:
function someFunctionName($arg1, $arg2, $arg3) {
//some logic
}
Unlike variables, our custom functions can be declared lower down in the execution path than where they actually get called. But this is true only if the function is guaranteed to be defined. If you place your function declaration inside any sort of conditional logic branch, its definition must be processed higher up in the code than any calls to it.
Another thing to notice, your function name must be unique, and it is not case sensitive. So if we have a function like SomeFunctionName somewhere else, then declaring ours is going to cause a fatal error. Not only can you not name your own functions the same, but you can’t use the names of any of the PHP library of built-in functions.
Back to the example though, let’s add some logic so our function does something:
function someFunctionName($arg1, $arg2, $arg3) {
$sum = $arg1 + $arg2 + $arg3;
return $sum;
}
To call it, I just write:
$result = someFunctionName(3,4,5);
echo ‘return value is ‘ . $result;
{show output}
What happens here is that my function call includes the values 3, 4, and 5. And when my function gets run, 3 will be used for $arg1, 4 will be used as $arg2, and 5 will be used as $arg3. It adds them together and returns their sum to the statement that called it, where it gets assigned to the variable $result. However, those variables only have meaning within our function. If we try to use one of them outside the function, PHP treats it like a completely separate variable.
{below call to someFunctionName add: echo ‘$arg1 is ‘ . $arg1;}
{show output}
In addition to a type and a value, PHP variables also have what’s called a scope. It’s sort of like their jurisdiction, to use a law enforcement analogy. Within their scope, they have a value, but outside of it, they have no identity. Once you define a function, all the variables used in there, whether from the argument list or ones you declare inside the logic of the function itself, they are completely isolated from the rest of your script. We refer to them as being in the function’s local scope. You can declare variables with the same names outside the function, but they will be totally different, because variables in the main script are said to be in the global scope. And the value of a variable in the global scope will have no bearing on the value of a variable within a function’s local scope. And the variables in the local scope of one function will be completely independent of the variables in the local scope of another function. However, there are ways around this, and they’re the subject of another video.
Anyway, that’s why functions will often have an argument list – so they can get data from the script to perform their logic on, since they can’t access outside variables directly. And you can see that in this case, the function returned the value 12, since that’s the sum of 3, 4, and 5.
And by the way, as you may have guessed already, calling the function, just like with picking a unique name for it, is not case sensitive. For readability, it is strongly recommended that you always call it with the same case characters for the name, but PHP does not enforce this.
{change function name without changing call}
{show output}
Now, my function definition specifies that it should receive 3 arguments. But watch what happens if I try calling this function with only 2 arguments:
{modify code}
{show output}
Since I defined my function as taking 3 arguments, when I only passed 2 I got that warning. It can keep going, but PHP is telling us that there’s a problem with this. One way to get around that warning is with a special operator in PHP, the @ symbol. If I place it on the line that will trigger a warning, the warning is suppressed. But if we really want to make an argument optional, there’s a better way to do that, and that’s by altering the argument list itself, so that PHP knows an argument is optional.
function someFunctionName($arg1, $arg2, $arg3 = 0) {
When PHP looks at this, it sees that if we omit the 3rd argument, it can still execute the function successfully because it knows that it can just use 3 as a default value in its place.
{show output}
Default values can be any of the simple types, like ints, floats, strings, and booleans, or they can also be arrays or nulls. What you cannot use for your defaults are variables. However, you can use constants, and we’ll look at that more in another video.
As a rule, you should only place your default arguments in the right-hand side of any argument list. Otherwise, any default value to the left of a required value will never get used. If I made my first argument required, I’d still have to pass something for the first argument in order to enter the second and third arguments, assuming they were required. And whatever I passed, even if it was just a null, would always take precedence over the default, so the default would never actually be used.
Now, we’ve seen what happens when we call one of our functions with too few arguments, but what if we call it with too many?
$sum = someFunctionName(3,4,5,6);
{show output}
Notice, nothing changed. PHP doesn’t care if your script passes more arguments than a function says it needs, it only complains if you pass fewer. You can pass a whole slew of arguments to a function that doesn’t have any in its definition. And if you want to see all the arguments that were passed, PHP provides a special set of built-in functions that you can use to do this.
Let’s modify our function a little bit:
function someFunctionName($arg1, $arg2, $arg3) {
if(func_num_args() > 3) {
$sum = array_sum(func_get_args());
} else {
$sum = $arg1 + $arg2 + $arg3;
}
return $sum;
}
Now, don’t get overwhelmed, I realize I’ve just introduced you to 3 new functions here, as well as another way to use functions. The first thing I want to point out is the fact that I’m using the return value of 2 of these functions directly without first casting their return values to a variable. When used this way, we refer to this technique as indirect referencing. PHP supports it just fine. It’s very handy.
As for the PHP built-in functions we’re using, the first one is func_num_args. When called from inside of a function, all it does is return the number of arguments that the function was called with.
The second built-in PHP function, func_get_args, when used inside a function it returns an array containing all of the arguments that were passed to this function.
The last built-in PHP function is one of several we look at together in a later video. Basically, it takes an array, tries to treat all of its values as numbers, and returns their sum total.
So basically, all I’m doing with this revised logic is saying that if our function gets called with more than 3 arguments, just add them all together instead of only adding together the first 3. So, now let’s see how this changes our output:
{show output}
So, obviously the 4th value is now included in that total. And in fact, we can go back and really simplify this function if we want to:
function someFunctionName($arg1, $arg2, $arg3) {
return array_sum(func_get_args());
}
By the way, before I close the video, I didn’t show an example of it, but functions do not need to return a value. That’s entirely optional. Some functions will just print out a fragment of an HTML page, and that’s totally fine. Others might do some specific action like write something to a file or alter some record in a database. There are lots of useful things functions can do without returning anything.
Now that you’ve learned about functions, you’re well on your way to creating some really useful and re-usable code.
February 12 2010 | Basics and PHP Programming Basics and PHP tutorial scripts | Comments Off on Creating custom functions
Next »